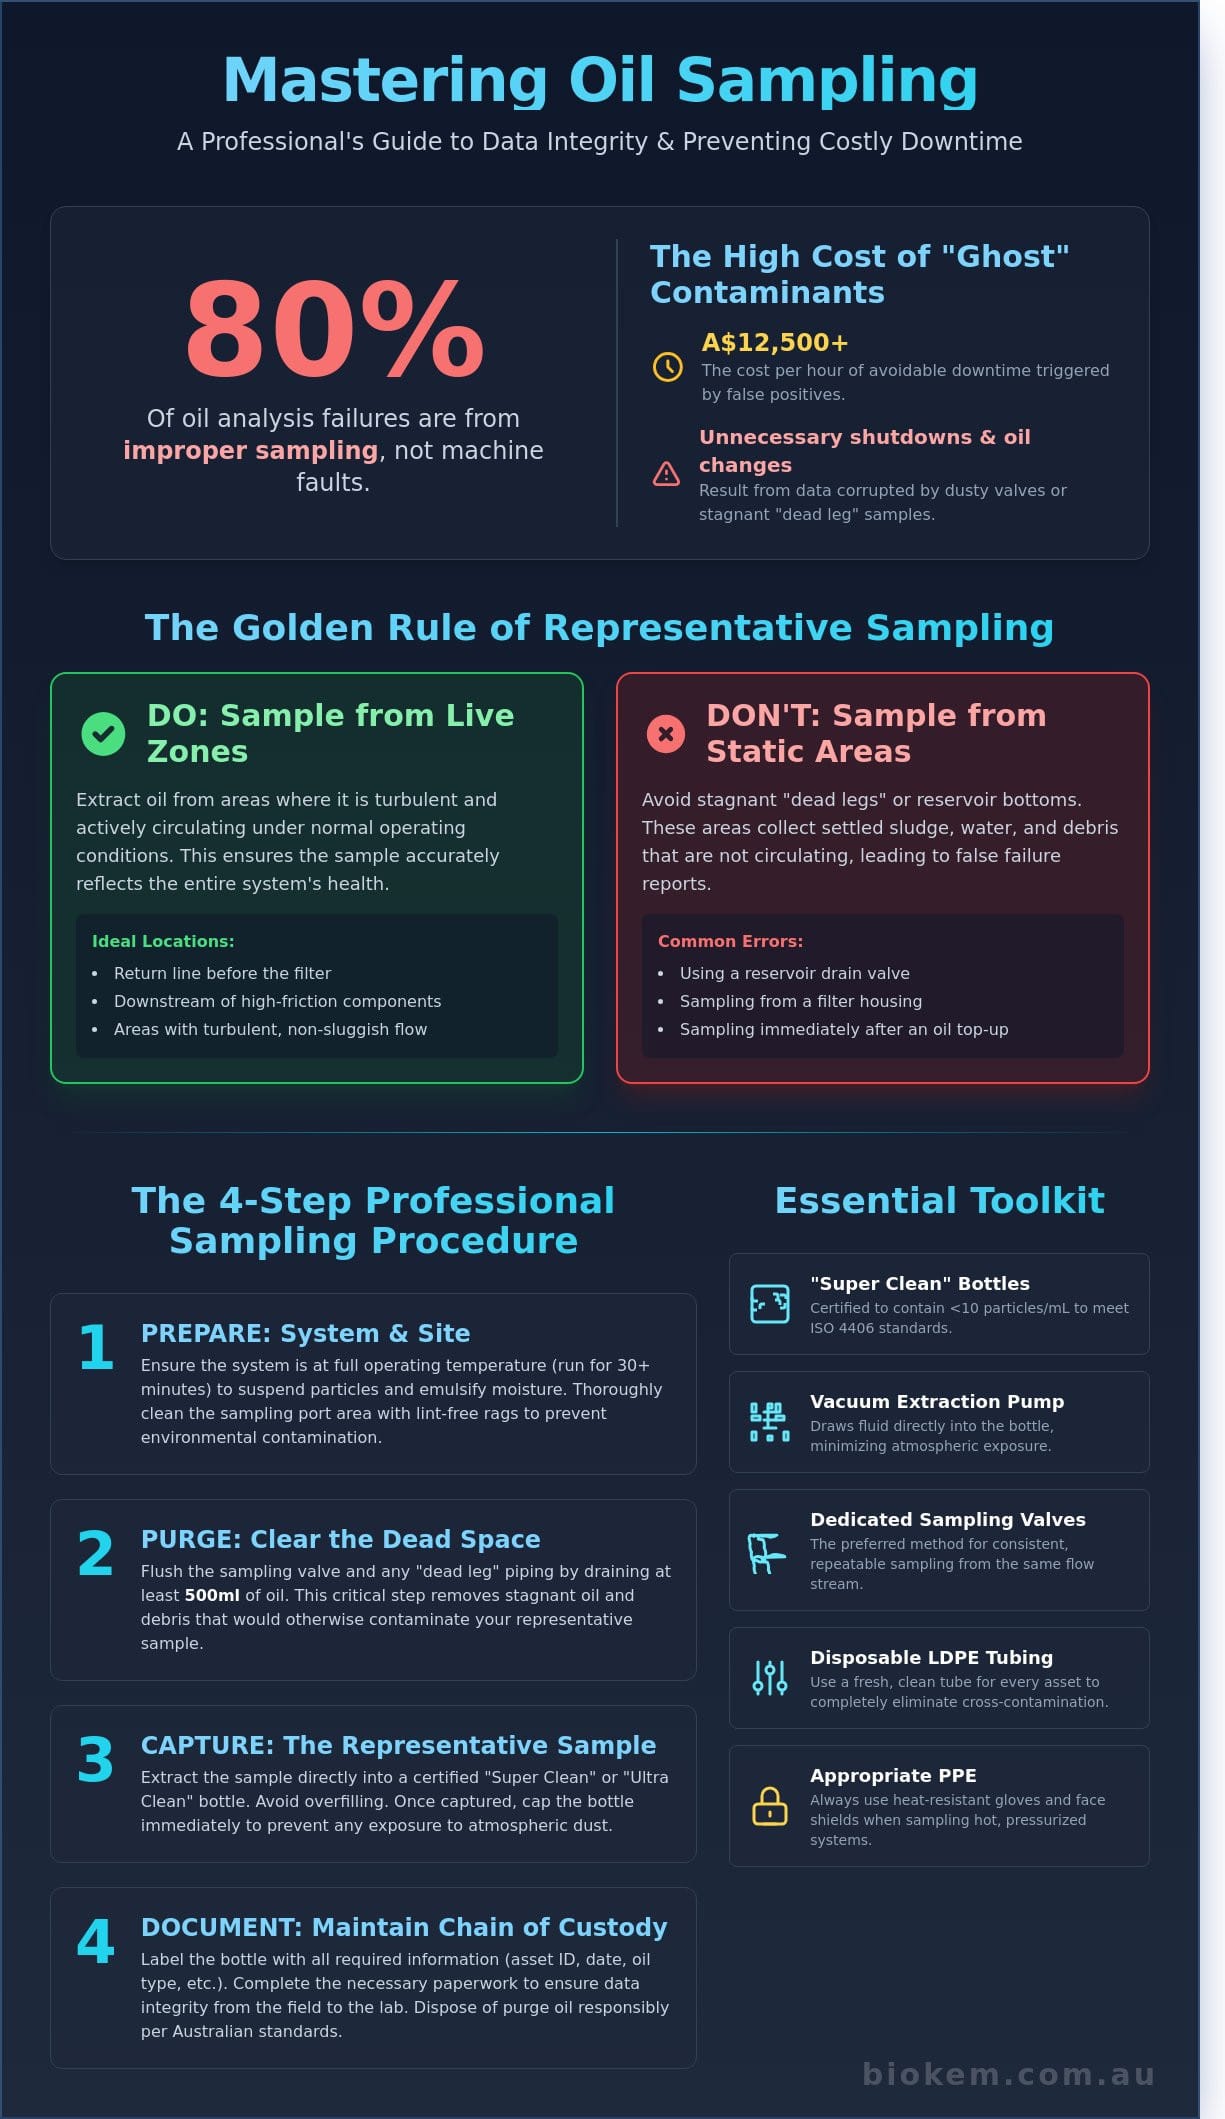
Did you know that up to 80% of oil analysis failures originate from improper sampling techniques rather than actual machinery faults? It’s a frustrating reality for maintenance managers who find themselves chasing “ghost” contaminants that don’t actually exist within the system. You understand that a lab report is only as reliable as the fluid captured in the bottle. When a technician extracts a sample from a stagnant “dead leg” or uses a dusty valve, the resulting ISO 4406 report can trigger unnecessary shutdowns. These false positives often cost Australian industrial operations upwards of A$12,500 per hour in avoidable downtime.
This guide establishes a professional standard for how to take an oil sample that ensures total data integrity. You’ll learn the precise mechanical protocols required to extract a representative sample, even from high-pressure zones or restricted access points. By mastering these repeatable, clean techniques, you can accurately monitor hydrocarbon health and extend the operational life of your critical assets. We’ll examine the specific hardware requirements, purging volumes, and the technical steps necessary to maintain compliance with Australian environmental and safety regulations.
Key Takeaways
- Understand the “Golden Rule” of sampling from live, turbulent zones to ensure your data accurately reflects the physical and chemical properties of your entire system.
- Identify the specific “Super Clean” bottles and vacuum extraction tools required to meet stringent ISO testing standards and prevent external contamination.
- Master the technical procedure of how to take an oil sample, including the precise flushing techniques needed to remove stagnant debris from dead spaces.
- Learn the professional requirements for maintaining a “Chain of Custody” and the environmentally responsible methods for disposing of purge oil in compliance with Australian standards.
- Discover how to translate critical lab reports into actionable maintenance strategies, such as determining the immediate need for professional hot oil flushing.
The Fundamentals of Representative Oil Sampling
A representative sample is a precise volume of fluid that mirrors the physical and chemical state of the entire system. Learning how to take an oil sample correctly is the difference between proactive maintenance and wasting A$5,000 on unnecessary oil changes or premature component replacements. The ‘Golden Rule’ dictates that samples must originate from ‘live’ zones. These are areas where oil is turbulent and actively circulating under normal operating loads. Static sampling, such as drawing from the bottom of a reservoir, is a common error. This practice captures settled sludge and water that has fallen out of suspension. It leads to false failure reports that don’t reflect the actual oil quality circulating through your machinery.
Maintaining the ‘Cleanliness Chain’ is vital for accurate ISO 4406 particle counts. If your sampling hardware or environment is contaminated, your results will be skewed. Industry data shows that 82% of wear-related failures start with particle contamination. Precise extraction ensures your lab data isn’t corrupted by atmospheric dust or dirty tools.
Maximizing Data Density in Your Sample
Data density refers to the concentration of diagnostic information, such as wear debris and microbial contaminants, per millilitre. To maximize this, you must identify ‘hot spots’ like the return line before the filter or downstream of high-friction components. Flow rate is a critical factor. If the flow is too sluggish, heavy metallic particles settle out of the stream. You need turbulent flow to keep these indicators suspended. This ensures the 100ml bottle captures a high-resolution image of the system’s health.
Minizing Data Disturbance
External dust and moisture are the primary enemies of data integrity. A single grain of silica entering an open bottle can jump an ISO 4406 code by two levels. Dead legs, or stagnant pipe sections, also pose a risk. They contain aged oil that skews chemical analysis results. Use a closed-loop mentality by employing dedicated sampling valves. This approach protects the integrity of the hydrocarbons. It ensures that when you assess how to take an oil sample, your lab report remains a blueprint for action rather than a product of environmental interference.
- Avoid sampling immediately after a top-up or oil change.
- Flush the sampling valve with at least 500ml of oil before capturing the sample.
- Ensure all sampling equipment is certified ‘ultra-clean’ to avoid baseline interference.
Essential Tools and Preparation for Sampling
The accuracy of your lab results depends entirely on the integrity of your collection process. If you don’t use the correct hardware, you risk introducing external contaminants that skew the data, leading to unnecessary maintenance or missed mechanical failures. Learning how to take an oil sample correctly begins with selecting a certified sample bottle. For ISO 4406 particle counting, ‘Super Clean’ or ‘Ultra Clean’ bottles are mandatory. These containers are processed in a controlled environment to ensure they contain fewer than 10 particles per millilitre at the 4-micron level. Using a standard, unrated container often introduces thousands of particles, making it impossible to determine the actual cleanliness of your fluid.
Safety is a non-negotiable priority during this process. Industrial fluids often operate at temperatures exceeding 70 degrees Celsius and under significant pressure. You must wear appropriate PPE, including heat-resistant gloves and a face shield. Before you open any part of the system, use lint-free rags and a solvent cleaner to strip away grime from the sampling port. This prevents environmental dust from entering the system or the sample bottle during the procedure.
The Sampling Hardware Checklist
- Vacuum extraction pumps: These allow for drawing fluid through tubing directly into the bottle without exposing the oil to the atmosphere.
- Disposable LDPE tubing: Use a fresh length of tubing for every asset to eliminate cross-contamination between different oil types or machinery.
- Patch test kits: These provide an immediate visual confirmation of wear debris and large contaminants while you’re still in the field.
- Sampling valves: Dedicated valves are preferred over vacuum pumps as they allow for consistent, repeatable sampling from the same flow stream.
Pre-Sampling System Checks
You can’t get a representative sample from a machine that’s been sitting idle. The system must reach its full operating temperature, which typically requires at least 30 minutes of run time. This ensures that any moisture is emulsified and particles are in total suspension rather than settled at the bottom of the sump. Ensure the machine is operating under its normal load conditions during the draw. Document the current temperature and pressure readings on the sample label. This data helps lab technicians interpret the viscosity and oxidation levels accurately. If your current setup makes it difficult to access clean fluid, upgrading to specialised filtration components can simplify the process while protecting your asset’s longevity.
Step-by-Step Oil Sampling Techniques
Mastering how to take an oil sample requires a disciplined approach to eliminate external contamination. Accuracy in the lab begins at the sampling point. Follow these five technical steps to ensure your data reflects the true condition of your lubricants.
- Step 1: Flush the sampling point. You must remove stagnant oil and accumulated debris from the valve or port. Stagnant fluid often contains 40% higher concentrations of wear metals than the active oil stream.
- Step 2: Calculate flush volume. Professional standards dictate a flush volume of 5 to 10 times the dead space in the sampling hardware. If your port and adapter hold 20ml of oil, you should purge at least 100ml to 200ml before collecting the sample.
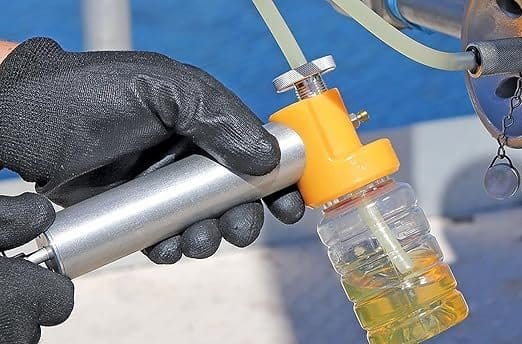
- Step 3: Extract mid-stream. Capture the sample while the oil is flowing at operating temperature. Avoid touching the bottle mouth to the valve or any surrounding surfaces. This prevents “hooking” surface dirt into the container.
- Step 4: Seal immediately. Airborne dust and moisture enter an open bottle in seconds. Secure the cap tightly the moment the bottle reaches the 80% fill mark.
- Step 5: Label the asset. Accurate data requires context. Clearly mark the asset ID, the date, and the current hour meter reading. Inaccurate meter readings can lead to false alarms regarding wear rates.
Method A: Sampling from Pressurized Lines
Sampling from live, pressurized systems is the gold standard for turbine and hydraulic monitoring. Using Minimess valves allows you to extract fluid at pressures up to 630 bar without interrupting system flow. It’s vital to manage the pressure drop carefully. If the oil “fizzes” or foams as it enters the bottle, you’ve aerated the sample, which can lead to inaccurate particle counts. This method provides the most representative data because the oil is under actual working conditions.
Method B: Vacuum Pump (Drop-Tube) Sampling
When sampling from reservoirs or gearboxes without fixed ports, use a vacuum pump. You must measure the tubing length to reach the exact middle of the oil level. This avoids the 15cm sludge layer at the bottom and the floating scum layer at the top. You must change the plastic tubing between every single sample. Reusing tubing is a primary cause of cross-contamination, often leading to A$1,000 in wasted laboratory costs and unnecessary oil changes.
Onsite Validation: The Patch Test
Waiting for lab results can take 48 to 72 hours. Integrating onsite tools like the particle pal range provides instant validation of fluid health. A patch test bridges the gap between field sampling and professional analysis by identifying “varnish” potential and large wear debris immediately. This proactive step allows technicians to spot a failing bearing or a breached seal before the formal report arrives, potentially saving thousands in unplanned downtime.
Post-Sampling: Documentation and Environmental Care
The integrity of your analysis relies on the ‘Chain of Custody’ as much as the fluid itself. A sample without a clear identity is a wasted resource. Once you have followed the steps for how to take an oil sample, secure the lid immediately to prevent atmospheric contamination. Australian transport regulations, specifically the Australian Dangerous Goods Code (ADGC), require samples to be double-bagged in leak-proof containers before shipping. If you can’t dispatch the sample within 24 hours, store it in a temperature-controlled environment between 15°C and 25°C. Avoid direct sunlight, as UV radiation can trigger photochemical reactions in synthetic esters and additives, potentially skewing your results.
Completing the Sample Information Sheet
Precision in data entry prevents analytical errors. You must record the exact oil brand and grade, alongside the ‘Time Since Last Change’ (TSLC). This metric is vital for trend analysis. A high wear metal count in oil with 500 hours of service is expected, whereas the same count at 50 hours indicates a critical failure. Document any recent top-ups; adding 10% new oil can mask depletion levels of anti-wear additives. Report any abnormal vibrations or temperature spikes observed during the sampling routine to provide the lab analyst with necessary context.
Sustainable Waste Management
Environmental care is a core pillar of professional maintenance. During the flushing phase, you may collect 200ml to 500ml of ‘purge’ oil. Don’t discard this into general waste. BioKem advocates for a consolidated recycling approach where hydrocarbons are managed through precise bioremediation. This nature-based method uses microbial action to break down contaminants, reducing the environmental footprint of your site. Implementing a zero-spill culture ensures that every drop of hydrocarbon is accounted for, protecting local Australian soil and waterways. If you’re looking for deeper insights into wear particles after your sample is taken, consider a professional filter ferrogram analysis to identify specific failure modes.
- Label immediately: Use a waterproof marker to record the date, machine ID, and sampling point.
- Secure packaging: Use absorbent material within the secondary packaging to contain potential leaks during transit.
- Minimize storage time: Aim for lab delivery within 48 hours to ensure the chemical state of the oil remains representative of the machine’s current condition.
- Consolidate waste: Use a dedicated, labelled container for all purge oil to simplify the recycling process.
Interpreting Results and Taking Action
Receiving a lab report marked “Critical” requires immediate operational decisions. These reports act as a diagnostic snapshot of your machine’s internal environment. When particulate counts exceed safe thresholds, performing a professional hot oil flushing procedure becomes necessary to remove built-up debris and restore system integrity. Understanding how to take an oil sample correctly ensures these reports are accurate, preventing unnecessary downtime or catastrophic failure. For systems showing high levels of oxidation, engaging specialists for varnish removal prevents the sticky deposits that cause servo-valve failure and cooling inefficiencies. Regular data collection builds a comprehensive health history, allowing you to track wear trends and predict component failure before it occurs.
From Analysis to Intervention
Analysis often centers on ISO 4406 cleanliness codes. If a report shows a jump from 16/14/11 to 21/19/16, it’s a clear signal to deploy off-line filtration equipment hire. When water content exceeds 0.05 percent, or 500 ppm, vacuum dehydration is often the only way to prevent oil additive dropout and internal corrosion. Maintaining these levels long-term is simplified by using high-performance Filters S.p.A. products. These components provide the rigorous filtration required for sensitive Australian industrial environments, ensuring that clean oil stays clean.
Building a World-Class Sampling Program
A robust program relies on repeatable processes. Training teams to maintain consistency across 24-hour shifts ensures that data reflects machine condition rather than sampling error. Knowing exactly how to take an oil sample at the same point, every time, is vital for data integrity. You should set sampling frequencies based on asset criticality, with high-risk assets often requiring monthly checks. BioKem supports Australian industry by providing the technical expertise and equipment needed to move from reactive repairs to a sophisticated, proactive oil management strategy that values long-term ecological and operational health.
Maximising Machinery Lifespan Through Representative Data
Effective predictive maintenance relies entirely on the integrity of your data. Mastering how to take an oil sample ensures your laboratory reports reflect the actual condition of your internal components rather than atmospheric dust or moisture. By standardising your sampling points and using dedicated primary valves, you eliminate the variables that lead to false positives. These precise technical protocols protect your hardware and support sustainable operations by extending fluid life cycles and reducing waste.
BioKem delivers the specialised support required to manage complex lubrication systems across the continent. We’re the sole Australian distributor for Filters S.p.A. and leverage over 15 years of Australian industrial lubrication expertise to solve your contamination issues. Our technicians provide onsite technical interventions for mining and power generation facilities, ensuring every system maintains peak performance. Optimize your asset reliability with BioKem’s professional oil analysis and filtration services. Refined sampling today builds a more resilient and environmentally sound operation for the future.
Frequently Asked Questions
How much oil do I need for a standard analysis sample?
A standard analysis requires between 100ml and 120ml of oil to ensure the laboratory can perform all necessary tests. This volume allows for primary testing and any required re-runs if the lab detects an anomaly. Filling the bottle to the 80% mark prevents leakage during transit while providing sufficient fluid for ISO 4406 particle counting and elemental analysis.
Can I take an oil sample from the drain plug?
You should avoid taking samples directly from the drain plug because the results won’t accurately reflect the system’s condition. Sediment and heavy wear particles naturally settle at the bottom of the sump, which often leads to false-positive reports of high contamination. If you must use this method, wait until 50% of the oil has drained before capturing the sample to achieve a more representative fluid profile.
How often should I sample my hydraulic or turbine oil?
Critical hydraulic systems require sampling every 500 operating hours, while turbine systems typically follow a 2,000-hour or quarterly schedule. Monitoring these intervals ensures you detect oxidative stress or microbial growth before equipment failure occurs. Following these Australian industry benchmarks helps maintain compliance with environmental standards and extends the lifespan of expensive hydrocarbon-based fluids.
What is the most common mistake made during oil sampling?
The most frequent error is taking a sample from a cold system or a “dead leg” where oil isn’t circulating. For a successful outcome, you must learn how to take an oil sample while the machine is at normal operating temperature, typically between 60°C and 80°C. Sampling during active circulation ensures that contaminants are held in suspension, providing a true snapshot of the system’s health.
Do I need to change the sample tube every time I use a vacuum pump?
You must replace the plastic tubing for every unique sample to prevent cross-contamination between different compartments or machines. Reusing a 1-metre length of LDPE tubing can carry over 50ppm of wear metals from a previous test, which completely invalidates your current data. Using fresh, clean tubing for every draw is a non-negotiable step in maintaining the integrity of your condition monitoring program.
What should I do if the oil is too thick to flow into the sample bottle?
If oil viscosity exceeds 460 cSt and won’t flow, you should use a high-vacuum pump specifically designed for heavy gear oils. Ensure the equipment has reached its full operating temperature of at least 70°C to reduce the fluid’s resistance. Never dilute the sample with solvents to improve flow; this destroys the chemical profile and renders the lab’s viscosity measurements useless.
How long can I wait to send the sample to the lab after taking it?
You should dispatch your samples to the laboratory within 24 to 48 hours of collection. Delaying shipment beyond 72 hours can lead to sample degradation, particularly if water or biological contaminants are present. Prompt delivery ensures that the data you receive reflects the current state of your Australian operations, allowing for immediate intervention if the lab identifies critical wear levels.
Why did my lab report show high silicon (dirt) when the system looks clean?
High silicon levels often result from airborne dust entering the bottle during the collection process, even if the system appears sealed. A single grain of sand can spike silicon readings by 20ppm in a standard 100ml sample. Understanding how to take an oil sample in a closed-loop manner using minimess valves reduces this risk. This ensures that 100% of the detected silicon actually comes from internal component wear or seal bypass.